AUGIde HotNews: Januar 2009 Tipps, Tipps, Tipps und Tipp Videos!


-Und wieder ist ein neuer AUGIde-HotNews erschienen, -HotNews 01/09 ist veröffentlicht.


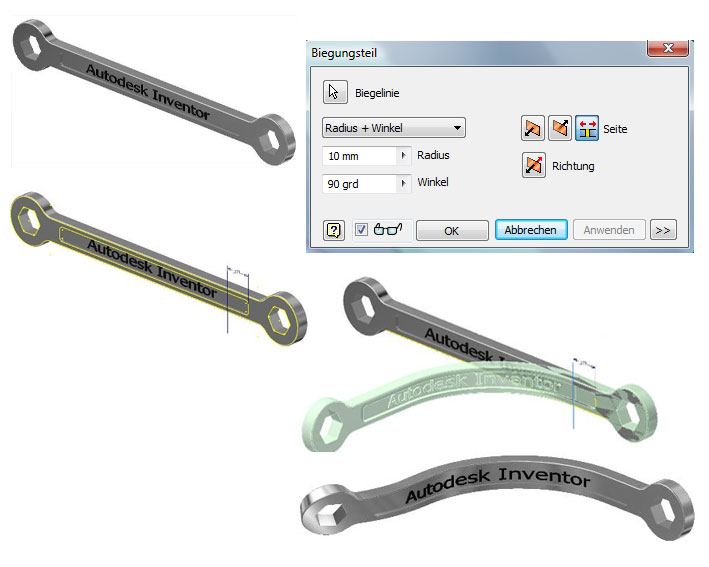
Leider konnte ich meinen Beitag zum Thema „Inventor AutoLimits“  erst nach Redaktionsschluß einsenden (Immer diese Deadlines). 🙂
Aber es ist ja fertig, nur 10 Minuten zu spät; also hier geht es >>> zum Video

Aber natürlich gibt es Inventor Material! -Für die eMail-Version des Hotnews hat Norman Roith 10 neue unverbrauchte Tipps für Sie beigesteuert!  

Norbert Gräser hat für alle Revit Anwender ein Video zum Thema  Rastergrafiken (Bilder) ein Video erstellt. 
In Revit können diese leider nicht mittels Sichtbarkeits-Parameter gesteuert werden.
Mit welcher Funktion es geht, erfahren Sie in diesem Tipp. >>> zum Video


Achtung!Achtung! -Ein neuer Autor ist mit dabei….  

AutoCAD Civil 3D und MAP 3D
ist Udo Hübner ein Civil Experte der mit Herz und Hand dabei ist, er hat für Sie 7 Tipps  zu  Civil 3D und Map 3D zusammengestellt.

Viel Spaß beim Lesen des neuen Hotnews,den kompletten HotNews finden Sie hier 

Autodesk Showcase calendar page for February 2009

showcase.jpg 

January nearly done, so now it is time for preparing the new showcase calendar page. This time I select a Inventor sample modell of a Foldable Crane. The original Modell is used to explain Positional Representation and drive constrains.

So I hope you like it! 🙂

februar_2009.jpg

Autodesk Inventor: Heute schon gebogen?

Wenn Sie mit  Inventor-Teile modellieren dann kann es auch mal nötig sein ein Bauteil zu biegen.

unbenannt-1.jpg

Workflow beim Biegen von Bauteilen:

  1. Erstellen Sie das Bauteil ohne Biegung als flaches Bauteil.
  2. Anschließend definieren Sie eine neue Skizze und erstellen eine Linie, die Sie später als Biegelinie nutzen. Vergessen Sie nicht diese Linie über Bemaßung und Abhängigkeiten zu positionieren. Sie sollte auch Überstehen.
  3. Als nächstes nutzen Sie dann die Funktion Biegen und wählen die Bigelinie an, definieren den zuverwendenen Radius und entscheiden in welche Richtung die Biegung ausgeführt wird.

Info am Rande:
Sie können auch beide Seiten gleichzeitig biegen, mit dem dritten Button bei der Auswahl der Biegeseite! Ansonsten, können Sie ein Bauteil auch durchaus mehrfach biegen. 🙂

autodesk_inventor.jpg Original Post von Garin Gardiner (Adsk)

Autodesk Inventor 2009 mit Star Trek feeling

Deutsch:
Kennen Sie den „Clock“-Ton der ertönt wenn Sie in Baugruppen Abhängigkeiten festlegen. Ich habe gehört, dass einige dieses Geräusch überhaupt nicht kennen! Naja, auch irgendwie logisch, denn wenn man am Arbeitsplatz keine Lautsprecher hat hört man auch nichts. 🙂

Egal, einige haben bestimmt Lautsprecher und vieleicht nervt der Ton mittlerweile.

akustisches-signal.png

  • Zum einen können sie ihn einfach deaktivieren wie im Bild zusehen.
  • Zum anderen können Sie hier etwas mehr Spaß in Ihren Konstruktionsalltag bringen. Wie wäre es mit alternativen Klängen? -Natürlich keine Töne die sehr lang sind, gut sind alle Töne die 0.01s -0.02s lang sind. Wie z.B. diese Star Track Sounds die ich noch auf meiner Sever-Festplatte gefunden habe.
    Sie müssen nur einen dieser Sound unter:
    C:\Programe\Autodesk\Inventor 2009\Bin
    Mit dem Namen Connect.wav abspeichern und schon geht es los! 🙂

English:
This morning I saw the blog posting from Mark Flayler of IMAGINiT Manufacturing Solutions Blog and yes, this is a cool Idea to change the original sound of the assembly constrain placement, instate of switching it off.

I like Star Trek, so I searched my storage and found some nice little sounds from Star Track (all shorter then 0.02s) that I want to surges as a replacement of the original sound. Just to have little bit of fun during the daily stress. 🙂

So find my my sound sugestions below. 

autodesk_inventor.jpg star-trek-sounds.zip   

Autodesk consulting team members at the Grand Canyon, a kind of Geocaching after AU2008

I know AU2008 is now part of the history, but it is still impressive, even when it was last month. I think it will remain for quiet a while in the world of mouth! 🙂

Actually I finished an article about Autodesk University that will be published in a few weeks in a German CAD-Magazin! You see, blogs are even faster than any printed Magazin. (Don’t take it too sirius, just jocking!!) But beside the lime light at AU2008 there are a lot of untold storys like this.

Lets begin:
As you know direct flights to Las Vegas are expensive during the week, but direct flights in general are more relaxing and less time consuming then connected flights. So I fly every year for a week to LV from Sunday to Sunday. this lowers the price for 30-40%, isn’t that great? I think it is! So this means I have to stay for two more days in Town after AU is finished and over the years more of my collages from Autodesk CE/EMIA came over to attend AU. This time I was in a group of 4 people and we decided to do something special, a kind of Geocaching. We (Driss, Christoph, Klaus and I) booked a Helicopter flight to the Grand Canyon. Hey, this was real fun and with a group of 4 we got a very good discount, so we really enjoyed this Tripp! Looking forward what we will do next time in LV.

So that you can get an Idea how it is in the Grand Canyon, please find some pictures from the jorny below:

-BTW

Just to give you an Idea on which level we have bin during our stay in the Canyon. That what looks like bushes in the back of the picture with me in front, these are trees.        

bild6.jpg bild5.jpg bild3.jpg

bild4.jpg bild2.jpg bild1.jpg

Autodesk Showcase: What about Bump Textures?

showcase.jpg 

English:
While you are setting up a scene in Autodesk Showcase you want to integrate ID-Plates or other information such as brand logos on a cell phone. In Showcase you you can integrate this by using decals.

This brings me straight to the point: 

„How to create a nice bump texture for the use as a decal in Showcase?“ 

You have some possible choices!

For the most of you the nvidia solution would be selected for the first approach (same with me), but how to integrate to use the Plug-in and how to get it on a surface?


Kyle Liao of OITC (Taiwan Autodesk Distributor) wrote a nice step by step tutorial how to work with the Plug-in and how to use it in Showcase.

Deutsch:
Wenn Sie mit Showcase arbeiten und gerade dabei sind eine Szene aufzubauen in der ein Typenschild verwendet werden soll oder etwas anderes wie zum Beispiel ein Firmenlogo erhaben auf der Oberfläche eines Handys erscheinen soll, dann erreichen Sie das durch den Einsatz von Decals.

Das bringt mich direkt zum Punkt:

“ Wie erstellt man eine erhabene Textur (Bump Texture) für ein Decal in Showcase?“ 

Letztlich haben Sie verschiedene Möglichkeiten:


Kyle Liao von OITC (Autodesk Distributor in Taiwan) hat zu diesem Thema ein Tutorial erstellt.

Enjoy reading!/Viel Spaß beim Lesen! 🙂

showcase.jpg CreatingNormal Maps for Bump Tuxtures in Showcase 2009